Search Results

Keyword: ‘tail’

SaltThePass mobile app now available on iTunes, Google Play and Amazon

July 31st, 2013

A few months ago I released SaltThePass.com, which is a password generator that will help you generate unique, secure passwords for all of the websites you visit based on a single Master Password that you remember.

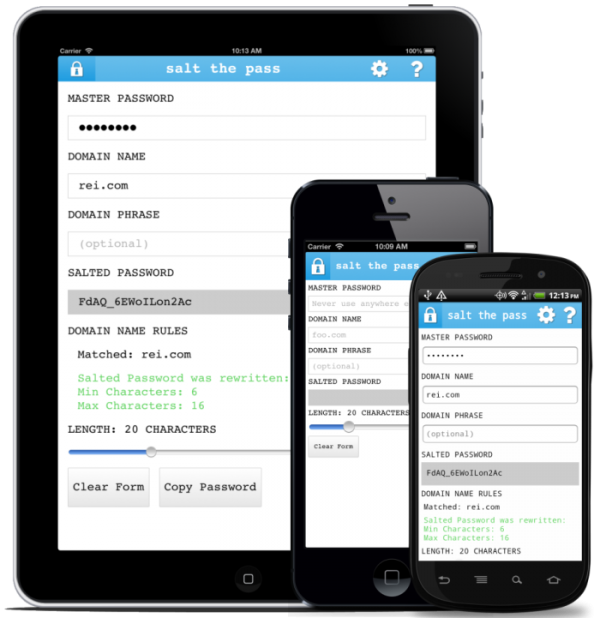
I’ve been working on a mobile / offline iOS and Android app that gives you all of the features of the saltthepass.com website.  The apps are now in the Apple iTunes App Store, Google Play App Store and the Amazon Appstore.

Let me know if you use them!
iPad, iPhone and Android apps available

How to deal with a WordPress wp-comments-post.php SPAM attack

May 9th, 2013

This morning I woke up to several website monitoring alarms going off.  My websites were becoming intermittently unavailable due to extremely high server load (>190).  It appears nicj.net had been under a WordPress comment-SPAM attack from thousands of IP addresses overnight.  After a few hours of investigation, configuration changes and cleanup, I think I’ve resolved the issue.  I’m still under attack, but the changes I’ve made have removed all of the comment SPAM and have reduced the server load back to normal.

Below is a chronicle of how I investigated the problem, how I cleaned up the SPAM, and how I’m preventing it from happening again.

Investigation

The first thing I do when website monitoring alarms are going off (I use Pingdom and Cacti) is to log into the server and check its load.  Load is an indicator of how busy your server is.  Anything greater than the number of CPUs on your server is cause for alarm.  My load is usually around 2.0 — when I logged in, it was 196:

[nicjansma@server3 ~]$ uptime
06:09:48 up 104 days, 11:25,  1 user,  load average: 196.32, 167.75, 156.40

Next, I checked top and found that mysqld was likely the cause of the high load because it was using 200-1000% of the CPU:

top - 06:16:45 up 104 days, 11:32, 2 users, load average: 97.69, 162.31, 161.74
Tasks: 597 total, 1 running, 596 sleeping, 0 stopped, 0 zombie
Cpu(s): 3.8%us, 19.1%sy, 0.0%ni, 10.7%id, 66.2%wa, 0.0%hi, 0.1%si, 0.0%st
Mem: 12186928k total, 12069408k used, 117520k free, 5868k buffers
Swap: 4194296k total, 2691868k used, 1502428k free, 3894808k cached

PID   USER  PR NI VIRT RES  SHR  S %CPU  %MEM TIME+ COMMAND
24846 mysql 20 0 26.6g 6.0g 2.6g S 260.6 51.8 18285:17 mysqld

Using SHOW PROCESSLIST in MySQL (via phpMyAdmin), I saw about 100 processes working on the wp_comments table in the nicj.net WordPress database.

I was already starting to guess that I was under some sort of WordPress comment SPAM attack, so I checked out my Apache access_log and found nearly 800,000 POSTS to wp-comments-post.php since yesterday.  They all look a bit like this:

[nicjansma@server3 ~]$ grep POST access_log
36.248.44.7 - - [09/May/2013:06:07:29 -0700] "POST /wp-comments-post.php HTTP/1.1" 302 20 "http://nicj.net/2009/04/01/" "Mozilla/4.0 (compatible; MSIE 6.0; Windows NT 5.1; SV1;)"

What’s worse, the SPAMs were coming from over 3,000 unique IP addresses.  Essentially, it was a distributed denial of service (DDoS) attack:

[nicjansma@server3 ~]$ grep POST access_log | awk '{print $1}' | sort | uniq -c | wc -l
3105

NicJ.net was getting hundreds of thousands of POSTS to wp-comments-post.php, which was causing Apache and MySQL to do a whole lot of work checking them against Akismet for SPAM and saving in the WordPress database.  I logged into the WordPress Admin interface, which verified the problem as well:

There are 809,345 comments in your spam queue right now.

Yikes!

Stopping the Attack

First things first, if you’re under an attack like this, the quickest thing you can do to stop the attack is by disabling comments on your WordPress site.  There are a few ways of doing this.

One way is to go into Settings > Discussion > and un-check Allow people to post comments on new articles.

The second way is to rename wp-comments-post.php, which is what spammers use directly to add comments to your blog.  I renamed my file wp-comments-post.php.bak temporarily, so I could change it back later.  In addition, I created a 0-byte placeholder file called wp-comments-post.php so the POSTS will look to the spammers like they succeeded, but the 0-byte file takes up less server resources than a 404 page:

[nicjansma@server3 ~]$ mv wp-comments-post.php wp-comments-post.php.bak && touch wp-comments-post.php

Either of these methods should stop the SPAM attack immediately.  5 minutes after I did this, my server load was back down to ~2.0.

Now that the spammers are essentially POSTing data to your blank wp-comments-post.php file, new comments shouldn’t be appearing in your blog.  While this will reduce the overhead of the SPAM attack, they are still consuming your bandwidth and web server connections with their POSTs.  To stop the spammers from even sending a single packet to your webserver, you can create a small script that automatically drops packets from IPs that are posting several times to wp-comments-post.php.  This is easily done via a simple script like my Autoban Website Spammers via the Apache Access log post.  Change THRESHOLD to something small like 10, and SEARCHTERM to wp-comments-post.php and you will be automatically dropping packets from IPs that try to post more than 10 comments a day.

Cleaning up the Mess

At this point, I still had 800,000+ SPAMs in my WordPress moderation queue.  I feel bad for Akismet, they actually classified them all!

I tried removing the SPAM comments by going to Comments > Spam > Empty Spam, but I think it was too much for Apache to handle and it crashed.  Time to remove them from MySQL instead!

Via phpMyAdmin, I found that not only were there 800,000+ SPAMs in the database, the wp_comments table was over 3.6 GB and the wp_commentmeta was at 8.1 GB!

Here’s how to clean out the wp_comments table from any comments marked as SPAM:

DELETE FROM wp_comments WHERE comment_approved = 'spam';

OPTIMIZE TABLE wp_comments

In addition to the wp_comments table, the wp_commentmeta table has metadata about all of the comments. You can safely remove any comment metadata for comments that are no longer there:

DELETE FROM wp_commentmeta WHERE comment_id NOT IN (SELECT comment_id FROM wp_comments)

OPTIMIZE TABLE wp_commentmeta

For me, this removed 800,000+ rows of wp_comments (bringing it down from 3.6 GB to just 207 KB) and 2,395,512 rows of wp_commentmeta (bringing it down from 8.1 GB to just 136 KB).

Preventing Future Attacks

There are a few preventative measures you can take to stop SPAM attacks like these.

NOTE: Remember to rename your wp-comments-post.php.bak (or turn Comments back on) after you’re happy with the prevention techniques you’re using.

  1. Disable Comments on your blog entirely (Settings > Discussion > Allow people to post comments on new articles.) (probably not desirable for most people)
  2. Turn off Comments for older posts (spammers seem to target older posts that rank higher in search results). Here’s a way to disable comments automatically after 30 days.
  3. Rename wp-comments-post.php to something else, such as my-comments-post.php. Comment spammers often just assume your code is at the wp-comments-post.php URL and won’t check your site’s HTML to verify this is the case. If you rename wp-comments-post.php and change all occurrences of that URL in your theme, your site should continue to work while the spammers hit a bogus URL. You can follow this renaming guide for more details.
  4. Enable a Captcha for your comments so automated bots are less likely to be able to SPAM your blog. I’ve had great success with Are You A Human.
  5. The Autoban Website Spammers via the Apache Access log post describes my method for automatically dropping packets from bad citizen IP addresses.

After all of these changes, my server load is back to normal and I’m not getting any new SPAM comments.  The DDoS is still hitting my server, but their IP addresses are slowly getting packets dropped via my script every 10 minutes.

Hopefully these steps can help others out there.  Good luck! Fighting spammers is a never-ending battle!
DIY Cloud Backup using Amazon EC2 and EBS

February 20th, 2012

I’ve created a small set of scripts that allows you to use Amazon Web Services to backup files to your own personal “cloud”. It’s available at GitHub for you to download or fork.

Features

  • Uses rsync over ssh to securely backup your Windows machines to Amazon’s EC2 (Elastic Compute Cloud) cloud, with persistent storage provided by Amazon EBS (Elastic Block Store)
  • Rsync efficiently mirrors your data to the cloud by only transmitting changed deltas, not entire files
  • An Amazon EC2 instance is used as a temporary server inside Amazon’s data center to backup your files, and it is only running while you are actively performing the rsync
  • An Amazon EBS volume holds your backup and is only attached during the rsync, though you could attach it to any other EC2 instance later for data retrieval, or snapshot it to S3 for point-in-time backup

Introduction

There are several online backup services available, from Mozy to Carbonite to Dropbox. They all provide various levels of backup services for little or no cost. They usually require you to run one of their apps on your machine, which backs up your files periodically to their “cloud” of storage.

While these services may suffice for the majority of people, you may wish to take a little more control of your backup process. For example, you are trusting their client app to do the right thing, and for your files to be stored securely in their data centers. They may also put limits on the rate they upload your backups, change their cost, or even go out of business.

On the other hand, one of the simplest tools to backup files is a program called rsync, which has been around for a long time. It efficiently transfers files over a network, and can be used to only transfer the parts of a file that have changed since the last sync. Rsync can be run on Linux or Windows machines through Cygwin. It can be run over SSH, so backups are performed with encryption. The problem is you need a Linux rsync server somewhere as the remote backup destination.

Instead of relying on one of the commercial backup services, I wanted to create a DIY backup “cloud” that I had complete control of. This script uses Amazon Web Services, a service from Amazon that offers on-demand compute instances (EC2) and storage volumes (EBS). It uses the amazingly simple, reliable and efficient rsync protocol to back up your documents quickly to Amazon’s data centers, only using an EC2 instance for the duration of the rsync. Your backups are stored on EBS volumes in Amazon’s data center, and you have complete control over them. By using this DIY method of backup, you get complete control of your backup experience. No upload rate-limiting, no client program constantly running on your computer. You can even do things like encrypt the volume you’re backing up to. NOTE: As of 2014-05-21, EBS volumes can be encrypted automatically.

The only service you’re paying for is Amazon EC2 and EBS, which is pretty cheap, and not likely to disappear any time soon. For example, my monthly EC2 costs for perfoming a weekly backup are less than a dollar, and EBS costs at this time are as cheap as $0.10/GB/mo.

These scripts are provided to give you a simple way to backup your files via rsync to Amazon’s infrastructure, and can be easily adapted to your needs.

How It Works

This script is a simple DOS batch script that can be run to launch an EC2 instance, perform the rsync, stop the instance, and check on the status of your instances.

After you’ve created your personal backup “cloud” (see Amazon Cloud Setup), and have the Required Tools, you simply run the amazon-cloud-backup.cmd -start to startup a new EC2 instance. Internally, this uses the Amazon API Developer Tools to start the instance via ec2-run-instances. There’s a custom bootscript for the instance, amazon-cloud-backup.bootscript.sh that works well with the Amazon Linux AMIs to enable root access to the machine over SSH (they initially only offer the user ec2-user SSH access). We need root access to perform the mount of the volume.

After the instance is started, the script attaches your personal EBS volume to the device. Its remote address is queried viaec2-describe-instances and SSH is used to mount the EBS volume to a backup point (eg, /backup). Once this is completed, your remote EC2 instance and EBS volume are ready for you to rsync.

To start the rsync, you simply need to run amazon-cloud-backup.cmd -rsync [options]. Rsync is started over SSH, and your files are backed up to the remote volume.

Once the backup is complete, you can stop the EC2 instance at any time by running amazon-cloud-backup.cmd -stop, or get the status of the instance by running amazon-cloud-backup.cmd -status. You can also check on the free space on the volume by running amazon-cloud-backup.cmd -volumestatus.

There are a couple things you will need to configure to set this all up. First you need to sign up for Amazon Web Services and generate the appropriate keys and certificates. Then you need a few helper programs on your machine, for example rsync.exe and ssh.exe. Finally, you need to set a few settings in amazon-cloud-backup.cmd so the backup is tailored to your keys and requirements.

Amazon “Cloud” Setup

To use this script, you need to have an Amazon Web Services account. You can sign up for one at https://aws.amazon.com/. Once you have an Amazon Web Services account, you will also need to sign up for Amazon EC2.

Once you have access to EC2, you will need to do the following.

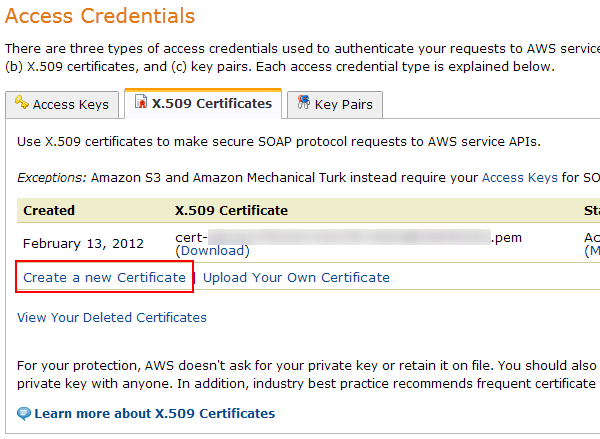
  1. Create a X.509 Certificate so we can enable API access to the Amazon Web Service API. You can get this in your Security Credentials page. Click on the X.509 Certificates tab, then Create a new Certificate. Download both the X.509 Private Key and Certificate files (pk-xyz.pem and cert-xyz.pem).
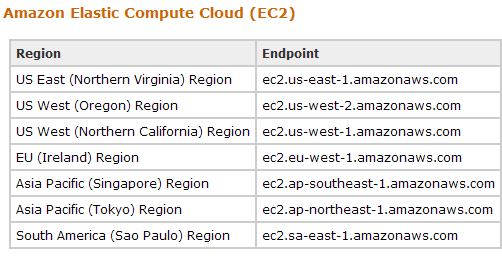
  2. Determine which Amazon Region you want to work out of. See their Reference page for details. For example, I’m in the Pacific Northwest so I chose us-west-2 (Oregon) as the Region.
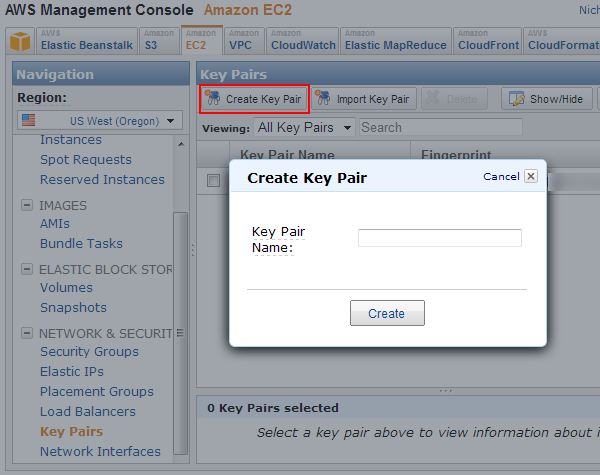
  3. Create an EC2 Key Pair so you can log into your EC2 instance via SSH. You can do this in the AWS Management Console. Click on Create a Key Pair, name it (for example, “amazon-cloud-backup-rsync”) and download the .pem file.
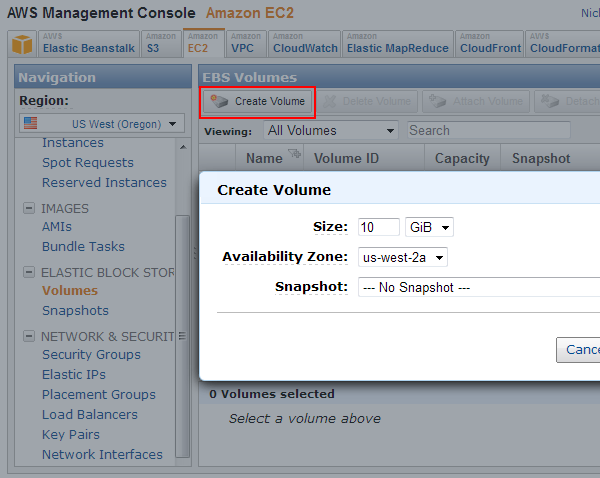
  4. Create an EBS Volume in the AWS Management Console. Click on Volumes and then Create Volume. You can create whatever size volume you want, though you should note that you will pay monthly charges for the volume size, not the size of your backed up files.
  5. Determine which EC2 AMI (Amazon Machine Image) you want to use. I’m using the Amazon Linux AMI: EBS Backed 32-bit image. This is a Linux image provided and maintained by Amazon. You’ll need to pick the appropriate AMI ID for your region. If you do not use one of the Amazon-provided AMIs, you may need to modify amazon-cloud-backup.bootscript.sh for the backup to work.
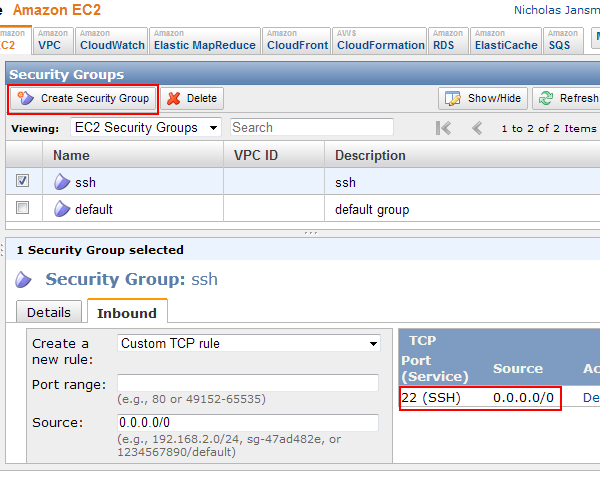
  6. Create a new EC2 Security Group that allows SSH access. In the AWS Management Console, under EC2, open the Security Groups pane. Select Create Security Group and name it “ssh” or something similar. Once added, edit its Inbound rules to allow port 22 from all sources “0.0.0.0/0”. If you know what your remote IP address is ahead of time, you could limit the source to that IP.
  7. Launch an EC2 instance with the “ssh” Security Group. After you launch the instance, you can use the Attach Volume button in theVolumes pane to attach your new volume as /dev/sdb.
  8. Log-in to your EC2 instance using ssh (see Required Toolsbelow) and fdisk the volume and create a filesystem. For example:
    ssh -i my-rsync-key.pem ec2-user@ec2-1-2-3-4.us-west-1.compute.amazonaws.com
    [ec2-user] sudo fdisk /dev/sdb
    ...
    [ec2-user] sudo mkfs.ext4 /dev/sdb1
  9. Your Amazon personal “Cloud” is now setup.

Many of the choices you’ve made in this section will need to be set as configuration options in the amazon-cloud-backup.cmd script.

Required Tools

You will need a couple tools on your Windows machine to perform the rsync backup and query the Amazon Web Services API.

  1. First, you’ll need a few binaries (rsync.exe, ssh.exe) on your system to facilitate the ssh/rsync transfer. Cygwin can be used to accomplish this. You can easily install Cygwin from http://www.cygwin.com/. After installing, pluck a couple files from the bin/folder and put them into this directory. The binaries you need are:
    rsync.exe
    ssh.exe
    sleep.exe

    You may also need a couple libraries to ensure those binaries run:

    cygcrypto-0.9.8.dll
    cyggcc_s-1.dll
    cygiconv-2.dll
    cygintl-8.dll
    cygpopt-0.dll
    cygspp-0.dll
    cygwin1.dll
    cygz.dll
  2. You will need the Amazon API Developer Tools, downloaded from http://aws.amazon.com/developertools/. Place them in a sub-directory called amazon-tools\

Script Configuration

Now you simply have to configure amazon-cloud-backup.cmd.

Most of the settings can be left at their defaults, but you will likely need to change the locations and name of your X.509 Certificate and EC2 Key Pair.

Usage

Once you’ve done the steps in Amazon “Cloud” Setup, Required Tools and Script Configuration, you just need to run the amazon-cloud-backup.cmd script.

These simple steps will launch your EC2 instance, perform the rsync, and then stop the instance.

amazon-cloud-backup.cmd -launch
amazon-cloud-backup.cmd -rsync
amazon-cloud-backup.cmd -stop

After -stop, your EC2 instance will stop and the EBS volume will be un-attached.

Source

The source code is available at GitHub. Feel free to send pull requests for improvements!

Auto-ban website spammers via the Apache access_log

January 24th, 2012

During the past few months, several of my websites have been the target of some sort of SPAM attack.  After my getting alerted that my servers were under high load (from Cacti), I found that a small number of IP addresses were loading and re-loading or POSTing to the same pages over and over again.  In one of the attacks, they were simply reloading a page several times a second from multiple IP addresses.  In another attack, they were POSTing several megabytes of data to a form (which spent time validating the input), several times a second. I’m not sure of their motives – my guess is that they’re either trying to game search rankings (the POSTings) or someone with an improperly configured robot.

Since I didn’t have anything in-place to automatically drop requests from these rogue SPAMmers, the servers were coming under increasing load and causing real visitor’s page loads to slow down.

After looking at the server’s Apache’s access_log, I was able to narrow down the IPs causing the issue.  With their IP, I simply created a few iptables rules to drop all packets from their IP addresses. Within a few seconds, the load on the server returned to normal.

I didn’t want to play catch-up the next time this happened, so I created a small script to automatically parse my server’s access_logs and auto-ban any IP address that appears to be doing inappropriate things.

The script is pretty simple.  It uses tail to look at the last $LINESTOSEARCH lines of the access_log, grabs all of the IPs via awk, sorts and counts them via uniq, then looks to see if any of these IPs had loaded more than $THRESHOLD pages.  If so, it does a quick query of iptables to see if the IP is already banned.  If not, it adds a single INPUT rule to DROP packets from that IP.

Here’s the code:

#!/bin/bash

#
# Config
#

# if more than the threshold, the IP will be banned
THRESHOLD=100

# search this many recent lines of the access log
LINESTOSEARCH=50000

# term to search for
SEARCHTERM=POST

# logfile to search
LOGFILE=/var/log/httpd/access_log

# email to alert upon banning
ALERTEMAIL=foo@foo.com

#
# Get the last n lines of the access_log, and search for the term.  Sort and count by IP, outputting the IP if it's
# larger than the threshold.
#
for ip in `tail -n $LINESTOSEARCH $LOGFILE | grep "$SEARCHTERM" | awk "{print \\$1}" | sort | uniq -c | sort -rn | head -20 | awk "{if (\\$1 > $THRESHOLD) print \\$2}"`
do
    # Look in iptables to see if this IP is already banned
    if ! iptables -L INPUT -n | grep -q $ip
    then
        # Ban the IP
        iptables -A INPUT -s $ip -j DROP
        
        # Notify the alert email
        iptables -L -n | mail -s "Apache access_log banned '$SEARCHTERM': $ip" $ALERTEMAIL
    fi
done

You can put this in your crontab, so it runs every X minutes. The script will probably need root access to use iptables.

I have the script in /etc/cron.10minutes and a crontab entry to run all files in that directory every 10 minutes: /etc/crontab:
0,10,20,30,40,50 * * * * root run-parts /etc/cron.10minutes

Warning: Ensure that the $SEARCHTERM you use will not match a wide set of pages that at web crawler (for example, Google) would see. In my case, I set SEARCHTERM=POST, because I know that Google will not be posting to my website as all of the forms are excluded from crawling via robots.txt.

The full code is also available at Gist.GitHub if you want to fork or modify it. It’s a rather simplistic, brute-force approach to banning rogue IPs, but it has worked for my needs. You could easily update the script to be a bit smarter. If you do, let me know!

The Unofficial LEGO Minifigure Catalog App

December 12th, 2011

I’m happy to announce the release of a new project I’ve been working on, The Unofficial LEGO Minifigure Catalog App.  Earlier this year, Dr. Christoph Bartneck released a new book titled The Unofficial LEGO Minifigure Catalog.  The book contains high quality photographs of all 3,600 minifigures released between the 1970s and 2010.  Dr. Barneck also introduces a new nomenclature for identifying and categorizing minifigures.  It’s a great book for LEGO fans, and is available from Amazon.

Since its release, I have been working with Dr. Bartneck on a mobile application that highlights all of the great content in the book.  Today, the app is available in the Android Market, and the iOS version has been submitted for review.  We think the app is a great companion for the book.

Features

<

ul>

  • More than 3650 Minifigures and 650 Heads listed
  • High-resolution photographs of every Minifigure
  • Thousands of LEGO sets listed
  • Browse by theme or year
  • Search by name
  • Manage favorite Minifigures
  • Mark the Minifigures you own
  • Import and export with Brickset.com account
  • Advanced downloading and caching technology
  • Regular updates
  •  

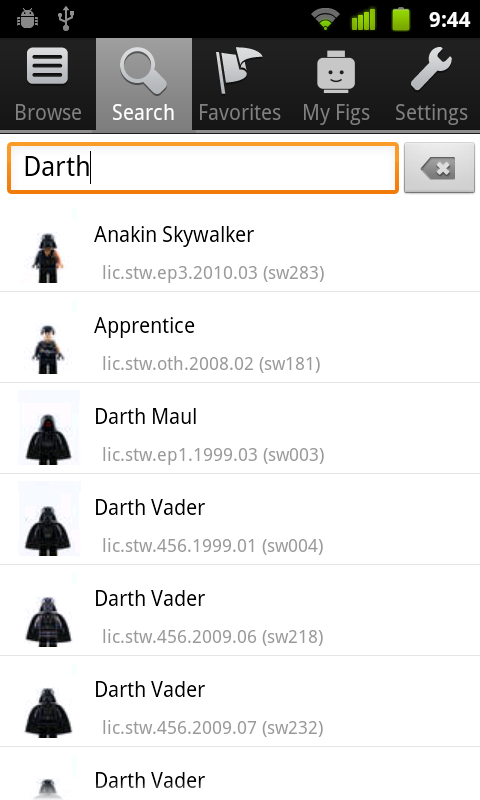
    Screen Shots

    Here are screenshots from an Android device:


    Availability

    The app is available today in the Android Market:


    The iOS version (iPod, iPhone, iPad) will be available as soon as Apple approves it.

    Please let us know what you think!