Switch your HTPC back to Media Center after logging out of Remote Desktop

May 23rd, 2012

I have a Windows 7 Media Center PC hooked up to the TV in our living room.  It’s paired to a 4-stream Ceton CableCard adapter and is great for watching both TV and movies.

Sometimes I need to Remote Desktop (RDP) into the machine to install updates or make other changes.  During this, and after logging out, the Media Center PC is left at the login-screen on the TV.  So the next time I sit down to watch TV, I have to find the wireless keyboard and enter my password to log back in.

Since this can get annoying, I’ve created a small script on the desktop that automatically switches the console session (what’s shown on the TV) back to the primary user and re-starts Media Center.  This way, the next person that uses the TV doesn’t have to log back in.  When I’m done in the RDP session, I simply start the batch script and it logs me out of RDP and logs the TV back in.

Here’s the simple script:

call %windir%\system32\tscon.exe 1 /dest:console
start "Media Center" /max %windir%\ehome\ehshell.exe
exit /b 1

PngOutBatch: Optimize your PNGs by running PngOut multiple times

May 15th, 2012

PngOut is a command-line tool that can losslessly reduce the file size of your PNGs. In many cases, it can reduce the size of a PNG by 10-15%. I’ve even seen some cases where it was able to reduce the file size by over 50%.

There are several other PNG compression utilties out there, such as pngcrush and AdvanceCOMP, but I’ve found PngOut to be the best optimizer most of the time.

There’s an excellent tutorial on PngOut for first-timers.  Running PngOut is pretty easy, simply run it once agaist your PNG:

PngOut.exe [image.png]

However, to get the best optimization of your images, you can run PngOut multiple times with different block sizes (eg, /b1024) and randomized initial tables (/r).

There’s a commercial program, PngOutWin that can run through all of the block sizes using multiple CPU cores, but I wanted something free that I could run from the command line.

To aid in this, I created a simple DOS batch script that runs PngOut through 9 different block sizes (from 0 to 8192), with each block size run multiple times with random initial tables.

While the first iteration of PngOut does all of the heavy lifting, I’ve sometimes found that using the different block sizes can eek out a few extra bytes (sometimes 100-bytes or more than the initial pass).  You may not care about optimizing your PNG to the absolute last byte possible, but I try to run any new PNGs ready for production in my websites and mobile apps through this batch script before they’re committed to the wild.

Running PngOutBatch is as easy as running PngOut:

PngOutBatch.cmd [image.png] [number of iterations per block size - defaults to 5]

PngOutBatch will show progress as it reduces the file size.  Here’s a sample compressing the PNG logo from libpng.org:

Blocksize: 0
Iteration #1: Saved 2529 bytes
Iteration #2: No savings
Iteration #3: No savings
Iteration #4: No savings
Iteration #5: No savings
Blocksize: 128
Iteration #1: Saved 606 bytes
Iteration #2: Saved 10 bytes
Iteration #3: No savings
Iteration #4: Saved 2 bytes
Iteration #5: No savings
Blocksize: 192
Iteration #1: No savings
Iteration #2: No savings
Iteration #3: No savings
Iteration #4: No savings
Iteration #5: No savings
Blocksize: 256
Iteration #1: Saved 1 bytes
Iteration #2: No savings
Iteration #3: Saved 5 bytes
Iteration #4: Saved 11 bytes
Iteration #5: No savings
Blocksize: 512
Iteration #1: No savings
Iteration #2: No savings
Iteration #3: No savings
Iteration #4: No savings
Iteration #5: No savings
Blocksize: 1024
Iteration #1: No savings
Iteration #2: No savings
Iteration #3: No savings
Iteration #4: No savings
Iteration #5: No savings
Blocksize: 2048
Iteration #1: No savings
Iteration #2: No savings
Iteration #3: No savings
Iteration #4: No savings
Iteration #5: No savings
Blocksize: 4096
Iteration #1: No savings
Iteration #2: No savings
Iteration #3: No savings
Iteration #4: No savings
Iteration #5: No savings
Blocksize: 8192
Iteration #1: No savings
Iteration #2: No savings
Iteration #3: No savings
Iteration #4: No savings
Iteration #5: No savings
D:\temp\test.png: SUCCESS: 17260 bytes originally, 14096 bytes final: 3164 bytes saved

The first block size (0) reduced the file by 2529 bytes, then the 128-byte block size further reduced it by 606, 10 then 2 bytes. The 192-byte block size didn’t help, but a 256-byte block size reduced the file size by 1, 5 then 11 more bytes.  Larger block sizes didn’t help, but at the end of the day we reduced the PNG by 3164 bytes (18%), and 635 bytes (25% more) than if we had only run it once.

The PngOutBatch.cmd script is hosted at Gist.Github if you want to use it or contribute changes.

DIY Cloud Backup using Amazon EC2 and EBS

February 20th, 2012

I’ve created a small set of scripts that allows you to use Amazon Web Services to backup files to your own personal “cloud”. It’s available at GitHub for you to download or fork.

Features

  • Uses rsync over ssh to securely backup your Windows machines to Amazon’s EC2 (Elastic Compute Cloud) cloud, with persistent storage provided by Amazon EBS (Elastic Block Store)
  • Rsync efficiently mirrors your data to the cloud by only transmitting changed deltas, not entire files
  • An Amazon EC2 instance is used as a temporary server inside Amazon’s data center to backup your files, and it is only running while you are actively performing the rsync
  • An Amazon EBS volume holds your backup and is only attached during the rsync, though you could attach it to any other EC2 instance later for data retrieval, or snapshot it to S3 for point-in-time backup

Introduction

There are several online backup services available, from Mozy to Carbonite to Dropbox. They all provide various levels of backup services for little or no cost. They usually require you to run one of their apps on your machine, which backs up your files periodically to their “cloud” of storage.

While these services may suffice for the majority of people, you may wish to take a little more control of your backup process. For example, you are trusting their client app to do the right thing, and for your files to be stored securely in their data centers. They may also put limits on the rate they upload your backups, change their cost, or even go out of business.

On the other hand, one of the simplest tools to backup files is a program called rsync, which has been around for a long time. It efficiently transfers files over a network, and can be used to only transfer the parts of a file that have changed since the last sync. Rsync can be run on Linux or Windows machines through Cygwin. It can be run over SSH, so backups are performed with encryption. The problem is you need a Linux rsync server somewhere as the remote backup destination.

Instead of relying on one of the commercial backup services, I wanted to create a DIY backup “cloud” that I had complete control of. This script uses Amazon Web Services, a service from Amazon that offers on-demand compute instances (EC2) and storage volumes (EBS). It uses the amazingly simple, reliable and efficient rsync protocol to back up your documents quickly to Amazon’s data centers, only using an EC2 instance for the duration of the rsync. Your backups are stored on EBS volumes in Amazon’s data center, and you have complete control over them. By using this DIY method of backup, you get complete control of your backup experience. No upload rate-limiting, no client program constantly running on your computer. You can even do things like encrypt the volume you’re backing up to. NOTE: As of 2014-05-21, EBS volumes can be encrypted automatically.

The only service you’re paying for is Amazon EC2 and EBS, which is pretty cheap, and not likely to disappear any time soon. For example, my monthly EC2 costs for perfoming a weekly backup are less than a dollar, and EBS costs at this time are as cheap as $0.10/GB/mo.

These scripts are provided to give you a simple way to backup your files via rsync to Amazon’s infrastructure, and can be easily adapted to your needs.

How It Works

This script is a simple DOS batch script that can be run to launch an EC2 instance, perform the rsync, stop the instance, and check on the status of your instances.

After you’ve created your personal backup “cloud” (see Amazon Cloud Setup), and have the Required Tools, you simply run the amazon-cloud-backup.cmd -start to startup a new EC2 instance. Internally, this uses the Amazon API Developer Tools to start the instance via ec2-run-instances. There’s a custom bootscript for the instance, amazon-cloud-backup.bootscript.sh that works well with the Amazon Linux AMIs to enable root access to the machine over SSH (they initially only offer the user ec2-user SSH access). We need root access to perform the mount of the volume.

After the instance is started, the script attaches your personal EBS volume to the device. Its remote address is queried viaec2-describe-instances and SSH is used to mount the EBS volume to a backup point (eg, /backup). Once this is completed, your remote EC2 instance and EBS volume are ready for you to rsync.

To start the rsync, you simply need to run amazon-cloud-backup.cmd -rsync [options]. Rsync is started over SSH, and your files are backed up to the remote volume.

Once the backup is complete, you can stop the EC2 instance at any time by running amazon-cloud-backup.cmd -stop, or get the status of the instance by running amazon-cloud-backup.cmd -status. You can also check on the free space on the volume by running amazon-cloud-backup.cmd -volumestatus.

There are a couple things you will need to configure to set this all up. First you need to sign up for Amazon Web Services and generate the appropriate keys and certificates. Then you need a few helper programs on your machine, for example rsync.exe and ssh.exe. Finally, you need to set a few settings in amazon-cloud-backup.cmd so the backup is tailored to your keys and requirements.

Amazon “Cloud” Setup

To use this script, you need to have an Amazon Web Services account. You can sign up for one at https://aws.amazon.com/. Once you have an Amazon Web Services account, you will also need to sign up for Amazon EC2.

Once you have access to EC2, you will need to do the following.

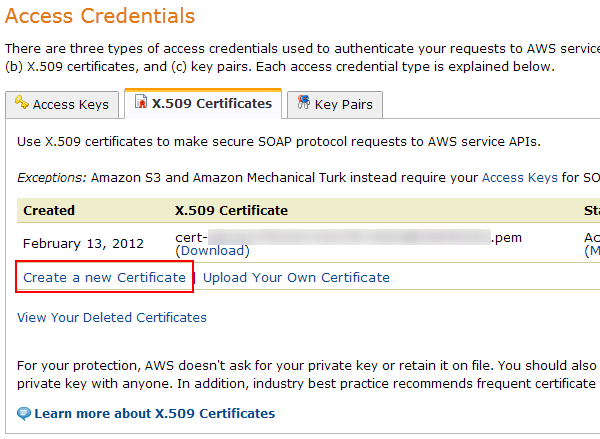
  1. Create a X.509 Certificate so we can enable API access to the Amazon Web Service API. You can get this in your Security Credentials page. Click on the X.509 Certificates tab, then Create a new Certificate. Download both the X.509 Private Key and Certificate files (pk-xyz.pem and cert-xyz.pem).
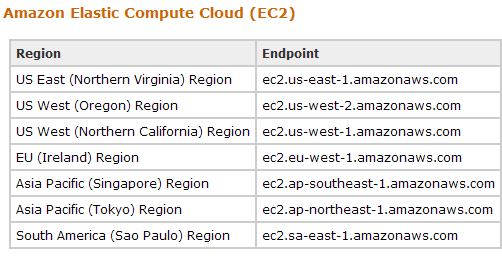
  2. Determine which Amazon Region you want to work out of. See their Reference page for details. For example, I’m in the Pacific Northwest so I chose us-west-2 (Oregon) as the Region.
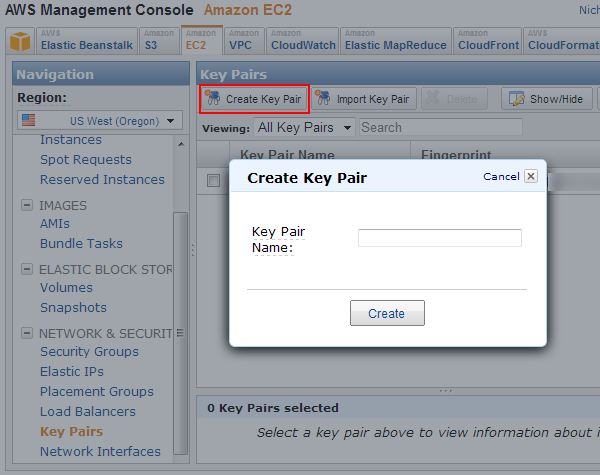
  3. Create an EC2 Key Pair so you can log into your EC2 instance via SSH. You can do this in the AWS Management Console. Click on Create a Key Pair, name it (for example, “amazon-cloud-backup-rsync”) and download the .pem file.
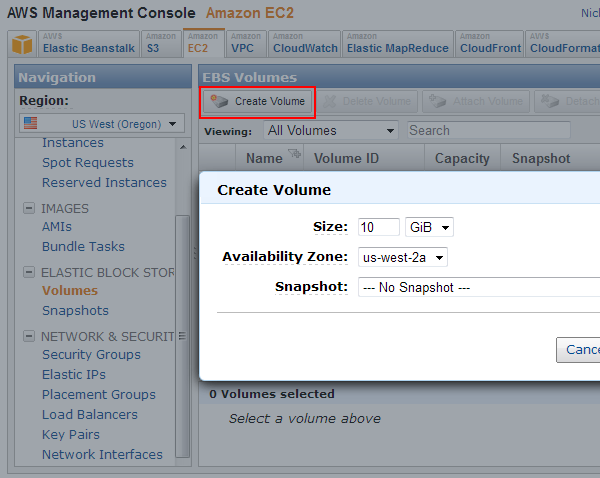
  4. Create an EBS Volume in the AWS Management Console. Click on Volumes and then Create Volume. You can create whatever size volume you want, though you should note that you will pay monthly charges for the volume size, not the size of your backed up files.
  5. Determine which EC2 AMI (Amazon Machine Image) you want to use. I’m using the Amazon Linux AMI: EBS Backed 32-bit image. This is a Linux image provided and maintained by Amazon. You’ll need to pick the appropriate AMI ID for your region. If you do not use one of the Amazon-provided AMIs, you may need to modify amazon-cloud-backup.bootscript.sh for the backup to work.
  6. Create a new EC2 Security Group that allows SSH access. In the AWS Management Console, under EC2, open the Security Groups pane. Select Create Security Group and name it “ssh” or something similar. Once added, edit its Inbound rules to allow port 22 from all sources “0.0.0.0/0”. If you know what your remote IP address is ahead of time, you could limit the source to that IP.
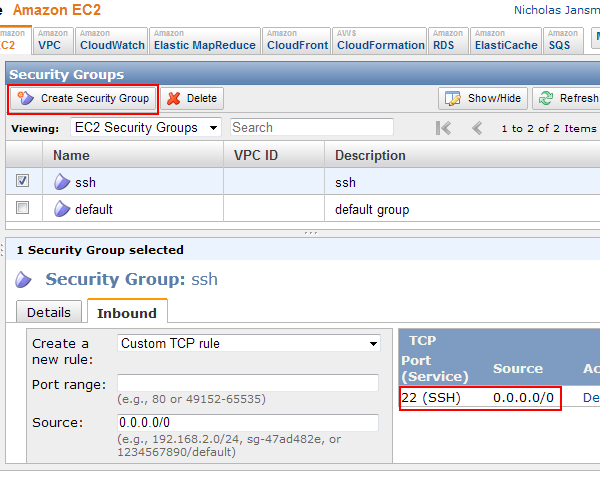
  7. Launch an EC2 instance with the “ssh” Security Group. After you launch the instance, you can use the Attach Volume button in theVolumes pane to attach your new volume as /dev/sdb.
  8. Log-in to your EC2 instance using ssh (see Required Toolsbelow) and fdisk the volume and create a filesystem. For example:
    ssh -i my-rsync-key.pem ec2-user@ec2-1-2-3-4.us-west-1.compute.amazonaws.com
    [ec2-user] sudo fdisk /dev/sdb
    ...
    [ec2-user] sudo mkfs.ext4 /dev/sdb1
  9. Your Amazon personal “Cloud” is now setup.

Many of the choices you’ve made in this section will need to be set as configuration options in the amazon-cloud-backup.cmd script.

Required Tools

You will need a couple tools on your Windows machine to perform the rsync backup and query the Amazon Web Services API.

  1. First, you’ll need a few binaries (rsync.exe, ssh.exe) on your system to facilitate the ssh/rsync transfer. Cygwin can be used to accomplish this. You can easily install Cygwin from http://www.cygwin.com/. After installing, pluck a couple files from the bin/folder and put them into this directory. The binaries you need are:
    rsync.exe
    ssh.exe
    sleep.exe

    You may also need a couple libraries to ensure those binaries run:

    cygcrypto-0.9.8.dll
    cyggcc_s-1.dll
    cygiconv-2.dll
    cygintl-8.dll
    cygpopt-0.dll
    cygspp-0.dll
    cygwin1.dll
    cygz.dll
  2. You will need the Amazon API Developer Tools, downloaded from http://aws.amazon.com/developertools/. Place them in a sub-directory called amazon-tools\

Script Configuration

Now you simply have to configure amazon-cloud-backup.cmd.

Most of the settings can be left at their defaults, but you will likely need to change the locations and name of your X.509 Certificate and EC2 Key Pair.

Usage

Once you’ve done the steps in Amazon “Cloud” Setup, Required Tools and Script Configuration, you just need to run the amazon-cloud-backup.cmd script.

These simple steps will launch your EC2 instance, perform the rsync, and then stop the instance.

amazon-cloud-backup.cmd -launch
amazon-cloud-backup.cmd -rsync
amazon-cloud-backup.cmd -stop

After -stop, your EC2 instance will stop and the EBS volume will be un-attached.

Source

The source code is available at GitHub. Feel free to send pull requests for improvements!

Windows command-line regular expression renaming tool: RenameRegex

January 30th, 2012

Every once in a while, I need to rename a bunch of files.  Instead of hand-typing all of the new names, sometimes a nice regular expression would get the job done a lot faster.  While there are a couple Windows GUI regular expression file renamers, I enjoy doing as much as I can from the command-line.

Since .NET exposes an easy to use library for regular expressions, I created a small C# command-line app that can rename files via any regular expression.

Usage:

RR.exe file-match search replace [/p]
  /p: pretend (show what will be renamed)

You can use .NET regular expressions for the search and replacement strings, including substitutions (for example, "$1" is the 1st capture group in the search term).

Examples:

Simple rename without a regular expression:

RR.exe * .ext1 .ext2

Renaming with a replacement of all "-" characters to "_":

RR.exe * "-" "_"

Remove all numbers from the file names:

RR.exe * "[0-9]+" ""

Rename files in the pattern of "123_xyz.txt" to "xyz_123.txt":

RR.exe *.txt "([0-9]+)_([a-z]+)" "$2_$1"

Download

You can download RenameRegex (RR.exe) from here.  The full source of RenameRegex is also available at GitHub if you want to fork or modify it. If you make changes, let me know!

Auto-ban website spammers via the Apache access_log

January 24th, 2012

During the past few months, several of my websites have been the target of some sort of SPAM attack.  After my getting alerted that my servers were under high load (from Cacti), I found that a small number of IP addresses were loading and re-loading or POSTing to the same pages over and over again.  In one of the attacks, they were simply reloading a page several times a second from multiple IP addresses.  In another attack, they were POSTing several megabytes of data to a form (which spent time validating the input), several times a second. I’m not sure of their motives – my guess is that they’re either trying to game search rankings (the POSTings) or someone with an improperly configured robot.

Since I didn’t have anything in-place to automatically drop requests from these rogue SPAMmers, the servers were coming under increasing load and causing real visitor’s page loads to slow down.

After looking at the server’s Apache’s access_log, I was able to narrow down the IPs causing the issue.  With their IP, I simply created a few iptables rules to drop all packets from their IP addresses. Within a few seconds, the load on the server returned to normal.

I didn’t want to play catch-up the next time this happened, so I created a small script to automatically parse my server’s access_logs and auto-ban any IP address that appears to be doing inappropriate things.

The script is pretty simple.  It uses tail to look at the last $LINESTOSEARCH lines of the access_log, grabs all of the IPs via awk, sorts and counts them via uniq, then looks to see if any of these IPs had loaded more than $THRESHOLD pages.  If so, it does a quick query of iptables to see if the IP is already banned.  If not, it adds a single INPUT rule to DROP packets from that IP.

Here’s the code:

#!/bin/bash

#
# Config
#

# if more than the threshold, the IP will be banned
THRESHOLD=100

# search this many recent lines of the access log
LINESTOSEARCH=50000

# term to search for
SEARCHTERM=POST

# logfile to search
LOGFILE=/var/log/httpd/access_log

# email to alert upon banning
ALERTEMAIL=foo@foo.com

#
# Get the last n lines of the access_log, and search for the term.  Sort and count by IP, outputting the IP if it's
# larger than the threshold.
#
for ip in `tail -n $LINESTOSEARCH $LOGFILE | grep "$SEARCHTERM" | awk "{print \\$1}" | sort | uniq -c | sort -rn | head -20 | awk "{if (\\$1 > $THRESHOLD) print \\$2}"`
do
    # Look in iptables to see if this IP is already banned
    if ! iptables -L INPUT -n | grep -q $ip
    then
        # Ban the IP
        iptables -A INPUT -s $ip -j DROP
        
        # Notify the alert email
        iptables -L -n | mail -s "Apache access_log banned '$SEARCHTERM': $ip" $ALERTEMAIL
    fi
done

You can put this in your crontab, so it runs every X minutes. The script will probably need root access to use iptables.

I have the script in /etc/cron.10minutes and a crontab entry to run all files in that directory every 10 minutes: /etc/crontab:
0,10,20,30,40,50 * * * * root run-parts /etc/cron.10minutes

Warning: Ensure that the $SEARCHTERM you use will not match a wide set of pages that at web crawler (for example, Google) would see. In my case, I set SEARCHTERM=POST, because I know that Google will not be posting to my website as all of the forms are excluded from crawling via robots.txt.

The full code is also available at Gist.GitHub if you want to fork or modify it. It’s a rather simplistic, brute-force approach to banning rogue IPs, but it has worked for my needs. You could easily update the script to be a bit smarter. If you do, let me know!