Archive

Archive for the ‘Tech’ Category

Mounting VHDs in Windows 7 from a command-line script

January 4th, 2012

Windows 7 has native support for VHDs (virtual hard disks) built into the OS. VHDs are great for virtual machines, native VHD booting into recent Windows OSs, or even moving whole file systems around.

While you can mount VHDs from the Windows 7 diskmgmt.msc GUI, or via vhdmount, if you need support for mounting or unmounting VHDs from the command-line on a vanilla Windows 7 / Server 2008 install, you have to use diskpart.

diskpart’s mount commands are pretty simple:

C:\> diskpart
DISKPART> sel vdisk file="[location of vhd]"
DISKPART> attach vdisk

Unmounting is just as simple:

C:\> diskpart
DISKPART> sel vdisk file="[location of vhd]"
DISKPART> detach vdisk

These commands work fine on an ad-hoc basis, but I had the need to automate loading a VHD from a script.  Luckily, diskpart takes a single parameter, /s, which specifies a diskpart “script”.  The script is simply the command you would have typed in above:

C:\> diskpart /s [diskpart script file]

I’ve created two simple scripts, MountVHD.cmd and UnmountVHD.cmd that create a “diskpart script”, run it, then remove the temporary file.  This way, you can simply run MountVHD.cmd and point it to your VHD:

C:\> MountVHD.cmd [location of vhd] [drive letter - optional]

Or unmount the same VHD:

C:\> UnMountVHD.cmd [location of vhd]

These files are hosted at Gist.Github if you want to use them or contribute changes.

Backing up Windows computers to a Synology NAS via SSH and rsync

January 4th, 2012

I recently purchased a Synology DS1511+ to act as a NAS (network attached storage) for my home network. The 5-drive, Linux powered device is beautiful – small, sleek and quiet. What sold me was the amazing web-based configuration interface they provide, and the ability to access the device remotely via the web or from mobile apps Synology provides in the iTunes App Store and Android Market.

After setting it up with a couple 2TB and 3TB drives, I wanted to use the device to backup documents from several Windows computers I manage (my own, my wife’s netbook and my parents’ computers thousands of miles away). Local network backup is pretty easy – you can use the Synology Data Replicator to backup Windows hosts to your Synology on your local network. However, it seemed pretty slow to me, and doesn’t use the highly-optimized rsync protocol for backing up files. Since I was previously using rsync over SSH to a Linux server I run at home, I figured since the Synology was Linux-based, it should be able to do the same.

All it takes is a few updates to the Synology server, and a few scripts on the Windows computers you want to backup to make this work for both computers on your home network as well as any external computers you want to backup, as long as they know the address of the remote server. You can use a dynamic-IP service such as TZO.com or DynDNS.org so your remote Windows clients know how to contact your home Synology.

Once I got it all working, I figured the process and scripts I created could be used by others with a Synology NAS (or any server or NAS running Linux). I’ve created a GitHub repository with the scripts and instructions so you can setup your own secure backup for local and remote Windows computers:

https://github.com/nicjansma/synology-windows-ssh-rsync-backup

Features

  • Uses rsync over ssh to securely backup your Windows hosts to a Synology NAS.
  • Each Windows host gets a unique SSH private/public key that can be revoked at any time on the server.
  • The server limits the SSH private/public keys so they can only run rsync, and can’t be used to log into the server.
  • The server also limits the SSH private/public keys to a valid path prefix, so rsync can’t destroy other parts of the file system.
  • Windows hosts can backup to the Synology NAS if they’re on the local network or on a remote network, as long as the outside IP/port are known.

NOTE: The backups are performed via the Synology root user’s credentials, to simplify permissions. The SSH keys are only valid for rsync, and are limited to the path prefix you specify. You could change the scripts to backup as another user if you want (config.csv).

Synology NAS Setup

  1. Enable SSH on your Synology NAS if you haven’t already. Go to Control Panel – Terminal, and check “Enable SSH service”.
  2. Log into your Synology via SSH.
  3. Create a /root/.ssh directory if it doesn’t already exist
    mkdir /root/.ssh
    chmod 700 /root/.ssh
  4. Upload server/validate-rsync.sh to your /root/.ssh/validate-rsync.sh. Then chmod it so it can be run:
    chmod 755 /root/.ssh/validate-rsync.sh
  5. Create an authorized_keys file for later use:
    touch /root/.ssh/authorized_keys
    chmod 600 /root/.ssh/authorized_keys
  6. Ensure private/public key logins are enabled in /etc/ssh/sshd_config.
    vi /etc/ssh/sshd_config

    You want to ensure the following lines are uncommented:

    PubkeyAuthentication yes
    AuthorizedKeysFile .ssh/authorized_keys
  7. You should reboot your Synology to ensure the settings are applied:
    reboot
  8. Setup a share on your Synology NAS for backups (eg, ‘backup’).

Client Package Preparation

Before you backup any clients, you will need to make a couple changes to the files in the client/ directory.

  1. First, you’ll need a few binaries (rsync, ssh, chmod, ssh-keygen) on your system to facilitate the ssh/rsync transfer. Cygwin can be used to accomplish this. You can easily install Cygwin from https://www.cygwin.com/. After installing, pluck a couple files from the bin/ folder and put them into the client/ directory. The binaries you need are:
    chmod.exe
    rsync.exe
    ssh.exe
    ssh-keygen.exe

    You may also need a couple libraries to ensure those binaries run:

    cygcrypto-0.9.8.dll
    cyggcc_s-1.dll
    cygiconv-2.dll
    cygintl-8.dll
    cygpopt-0.dll
    cygspp-0.dll
    cygwin1.dll
    cygz.dll
  2. Next, you should update config.csv for your needs:
    rsyncServerRemote - The address clients can connect to when remote (eg, a dynamic IP host)
    rsyncPortRemote - The port clients connect to when remote (eg, 22)
    rsyncServerHome - The address clients can connect to when on the local network (for example, 192.168.0.2)
    rsyncPortHome - The port clients connect to when on the local network (eg, 22)
    rsyncUser - The Synology user to backup as (eg, root)
    rsyncRootPath - The root path to back up to (eg, /volume1/backup)
    vcsUpdateCmd - If set, the version control system command to use prior to backup up (eg, svn up)
  3. The version control update command (%vcsUpdateCmd%) can be set to run a version control update on your files prior to backing up. This can be useful if you have a VCS repository that clients can connect to. It allows you to make remote changes to the backup scripts, and have the clients get the updated scripts without you having to log into them. The scripts are updated each time start-backup.cmd is run. For example, you could use this command to update from a svn repository:
    vcsUpdateCmd,svn up

    If you are using a VCS system, you should ensure you have the proper command-line .exes and .dlls in the client/ directory. I’ve used Collab.net’s svn.exe and lib*.dll files from their distribution (https://www.collab.net/downloads/subversion/).

    During client setup, you simply need to log into the machine, checkout the repository, and setup a scheduled task to do the backups (see below). Each time a backup is run, the client will update its backup scripts first.

The client package is now setup! If you’re using %vcsUpdateCmd%, you can check the client/ directory into your remote repository.

Client Setup

For each client you want to backup, you will need to do the following:

  1. Generate a private/public key pair for the computer. You can do this by running ssh-keygen.exe, or have generate-client-keys.cmd do it for you:
    generate-client-keys.cmd

    or

    generate-client-keys.cmd [computername]

    If you run ssh-keygen.exe on your own, you should name the files rsync-keys-[computername]:

    ssh-keygen.exe -t dsa -f rsync-keys-[computername]

    If you run ssh-keygen.exe on your own, do not specify a password, or clients will need to enter it every time they backup.

  2. Grab the public key out of rsync-keys-[computername].pub, and put it into your Synology backup user’s .ssh/authorized_keys:
    vi ~/.ssh/authorized_keys

    You will want to prefix the authorized key with your validation command. It should look something like this

    command="[validate-rsync.sh location] [backup volume root]" [contents of rsync-keys-x.pub]

    For example:

    command="/root/.ssh/validate-rsync.sh /volume1/backup/MYCOMPUTER" ssh-dss AAAdsadasds...

    This ensures that the public/private key is only used for rsync (and can’t be used as a shell login), and that the rsync starts at the specified root path and no higher (so it can’t destroy the rest of the filesystem).

  3. Copy backup-TEMPLATE.cmd to backup-[computername].cmd
  4. Edit the backup-[computername].cmd file to ensure %rsyncPath% is correct. The following DOS environment variable is available to you, which is set in config.csv:
    %rsyncRootPath% - Remote root rsync path

    You should set rsyncPath to the root remote rsync path you want to use. For example:

    set rsyncPath=%rsyncRootPath%/%COMPUTERNAME%

    or

    set rsyncPath=%rsyncRootPath%/bob/%COMPUTERNAME%

    %rsyncRootPath% is set in config.csv to your Synology backup volume (eg, /volume1/backup), so %rsyncPath% would evaluate to this if your current computer’s name is MYCOMPUTER:

    /volume1/backup/MYCOMPUTER

    You can see this is the same path that you put in the authorized_keys file.

  5. Edit the backup-[computername].cmd file to run the appropriate rsync commands. The following DOS environment variables are available to you, which are set in start-backup.cmd:
    %rsyncStandardOpts% - Standard rsync command-line options
    %rsyncConnectionString% - Rsync connection string

    For example:

    set cmdArgs=rsync %rsyncStandardOpts% "/cygdrive/c/users/bob/documents/" %rsyncConnectionString%:%rsyncPath%/documents
    echo Starting %cmdArgs%
    call %cmdArgs%
  6. Copy the client/ directories to the target computer, say C:\backup. If you are using %vcsUpdateCmd%, you can checkout the client directory so you can push remote updates (see above).
  7. Setup a scheduled task (via Windows Task Scheduler) to run start-backup.cmd as often as you wish.
  8. Create the computer’s backup directory on your Synology NAS:
    mkdir /volume1/backup/MYCOMPUTER

The client is now setup!

Source

As noted above, the source for these scripts is available on Github:

https://github.com/nicjansma/synology-windows-ssh-rsync-backup

If you have any suggestions, find a bug or want to make contributions, please head over to GitHub!

Unofficial LEGO Minifigure Catalog App now available in Apple AppStore

December 16th, 2011

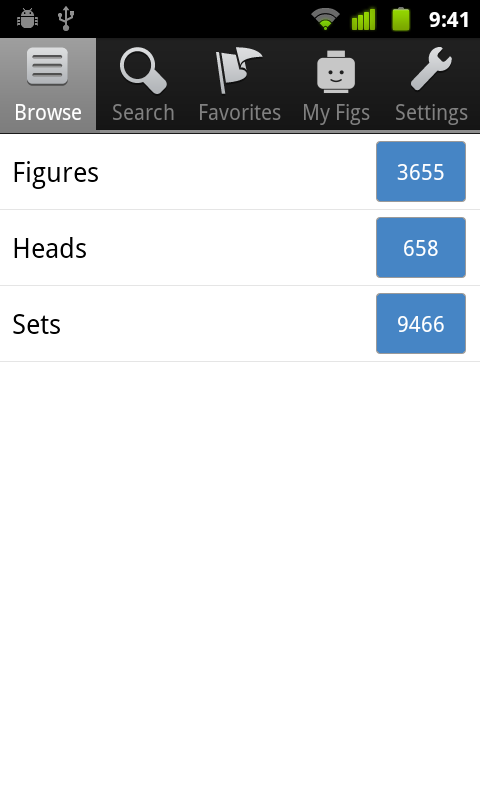
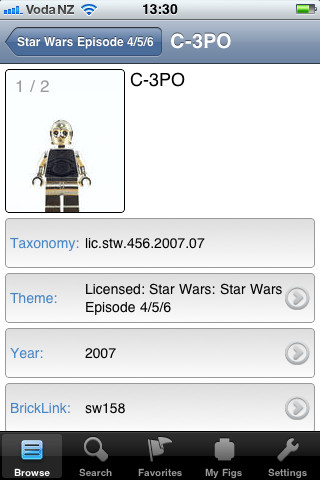
Our Unofficial LEGO Minifigure Catalog App was just approved by Apple and is now available in the AppStore!

The Unofficial LEGO Minifigure Catalog App

December 12th, 2011

I’m happy to announce the release of a new project I’ve been working on, The Unofficial LEGO Minifigure Catalog App.  Earlier this year, Dr. Christoph Bartneck released a new book titled The Unofficial LEGO Minifigure Catalog.  The book contains high quality photographs of all 3,600 minifigures released between the 1970s and 2010.  Dr. Barneck also introduces a new nomenclature for identifying and categorizing minifigures.  It’s a great book for LEGO fans, and is available from Amazon.

Since its release, I have been working with Dr. Bartneck on a mobile application that highlights all of the great content in the book.  Today, the app is available in the Android Market, and the iOS version has been submitted for review.  We think the app is a great companion for the book.

Features

<

ul>

  • More than 3650 Minifigures and 650 Heads listed
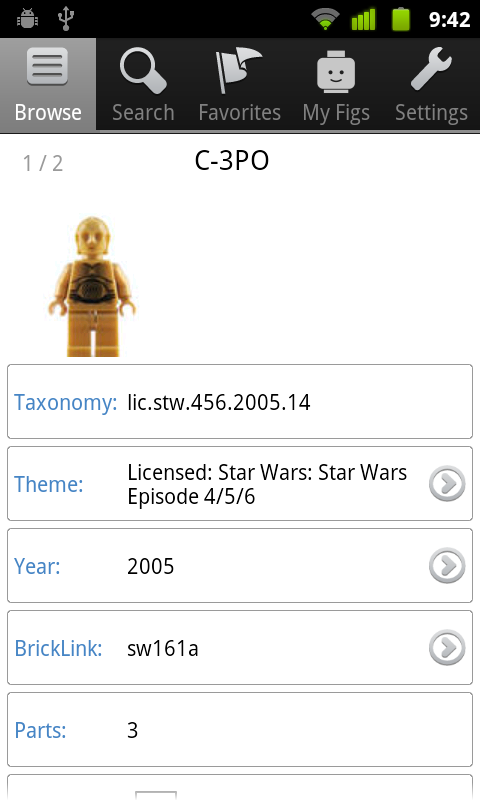
  • High-resolution photographs of every Minifigure
  • Thousands of LEGO sets listed
  • Browse by theme or year
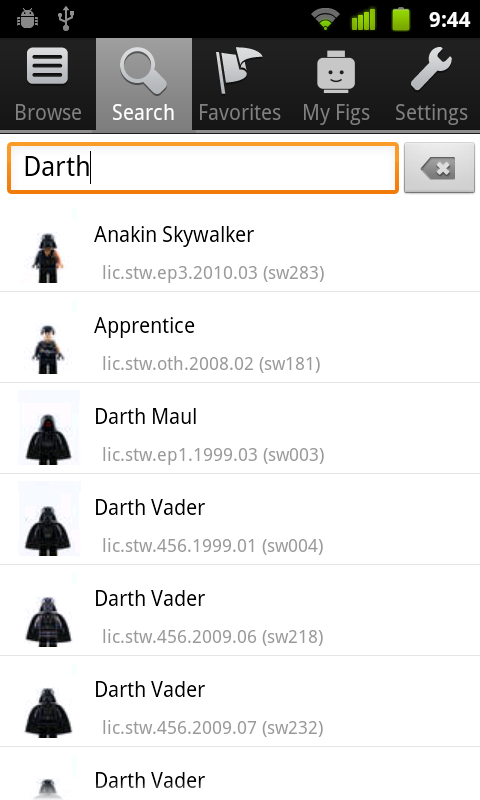
  • Search by name
  • Manage favorite Minifigures
  • Mark the Minifigures you own
  • Import and export with Brickset.com account
  • Advanced downloading and caching technology
  • Regular updates
  •  

    Screen Shots

    Here are screenshots from an Android device:


    Availability

    The app is available today in the Android Market:


    The iOS version (iPod, iPhone, iPad) will be available as soon as Apple approves it.

    Please let us know what you think!

    Amazon S3/CloudFront 304s stripping Cache-Control headers

    October 7th, 2011

    TL;DR: Beware of relying on Cache-Control: max-age and Expires HTTP header fallback behavior on Amazon CloudFront. The Cache-Control header may get stripped on CloudFront 304s, and browsers will then have to fall back to whatever is in the Expires header. If that Expires date has passed, or if you never specified it, all subsequent requests for the resource will be conditionally validated by the browser.

    Update 2011-12-18: The Amazon CloudFront team has fixed the issue!
    The Problem

    I was looking at my web server’s health metrics recently (via Cacti), and noticed a spike in outbound traffic and HTTP requests. Analytics logs didn’t show a large increase in visitors or page loads, and it looked like the additional traffic was simply an increase in requests for static images.

    The Investigation

    The static images in question have HTTP Cache headers set for 1 year into the future, so they can be easily cached by browsers and proxies per performance best-practices. The suggested way to set a far expiry date is by setting both the Cache-Control header (eg, Cache-Control: public, max-age=31536000), as well as an Expires header with a static date set for the same time in the future. The Expires header is a HTTP/1.0 header that sets a specific date, say Jan 1 2011, whereas Cache-Control is relative, in seconds. Theoretically, if both Cache-Control and Expires headers are sent, the Cache-Control header should take precedence, so it’s safe to additionally set Expires for fall-back cases.

    This combination of caching header behavior works good if you are using Amazon’s CloudFront CDN, backed by static files on Amazon S3, which is what I use for several sites. The files are uploaded once to S3, and their HTTP headers are set at upload time.  For the static images, I am uploading them with a 1-year max-age expiry and an Expires header 1 year from when they’re uploaded. For example, I uploaded an image to S3 on Oct 5 2010 with these headers:

    Cache-Control: public, max-age=31536000
    Expires: Thu, 05 Oct 2011 22:45:05 GMT

    Theoretically, HTTP/1.1 clients (current web browsers) and even ancient HTTP/1.0 proxies should both be able to understand these headers. Even though the Expires header was for Oct 5 2011 (a couple days ago), Cache-Control should take precedence and the content should still be fresh for all current web browsers that recently downloaded the file. HTTP/1.0 proxies will only understand the Expires header, and they may want to conditionally validate the content if the date is past Oct 5 2011, but they should be a small part of HTTP accesses.

    So my first thought was that the additional load on the server was from HTTP/1.0 proxies re-validating the already-expired content since I had set the content to expire in 1 year and that date had just passed. I should have set a much-further expiry in the first place — these images never change. To fix this, I could easily just re-upload the content with a much longer Expires (30 years from now should be sufficient).

    However, as I was investigating the issue, I noticed via the F12 Developer Tools that IE9 was conditionally validating some of the already-expired images, even though the Cache-Control header should be taking precedence. Multiple images were being conditionally re-validated (incurring a HTTP request and 304 response), for every IE session. All of these images had Expires header date that recently passed.

    After I cleared my IE browser cache, the problem no longer repro’d. It was only after I happened to F5 the page (refresh) that the past-Expires images were being conditionally requested again on subsequent navigations.

    The Repro

    Take, for example, this request of a static file on my webserver that expired back on Jan 1, 2010:

    GET /test/test-public.txt HTTP/1.1
    Accept: text/html, application/xhtml+xml, */*
    Accept-Language: en-US
    User-Agent: Mozilla/5.0 (compatible; MSIE 9.0; Windows NT 6.1; WOW64; Trident/5.0)
    Accept-Encoding: gzip, deflate
    Connection: Keep-Alive
    Host: cf.nicj.net
    HTTP/1.0 200 OK Date: Sat, 08 Oct 2011 02:28:03 GMT
    Cache-Control: public, max-age=946707779
    Expires: Fri, 01 Jan 2010 00:00:00 GMT 
    Last-Modified: Sat, 08 Oct 2011 02:25:58 GMT
    ETag: "098f6bcd4621d373cade4e832627b4f6"
    Accept-Ranges: bytes
    Content-Type: text/plain
    Content-Length: 4
    Server: AmazonS3

    IE and other modern browsers will download this content today, and treat it as fresh for 30 years (946,707,779 seconds), due to the Cache-Control header taking precedence over the Jan 1, 2010 Expires header.

    The problem comes when, for whatever reason, a browser conditionally re-validates the content (via If-Modified-Since). Here are IE’s request headers and Amazon’s CloudFront response headers:

    GET /test/test-public.txt HTTP/1.1
    Accept: text/html, application/xhtml+xml, */*
    Accept-Language: en-US
    User-Agent: Mozilla/5.0 (compatible; MSIE 9.0; Windows NT 6.1; WOW64; Trident/5.0)
    Accept-Encoding: gzip, deflate
    Connection: Keep-Alive
    Host: cf.nicj.net
    If-Modified-Since: Sat, 08 Oct 2011 02:28:03 GMT
    HTTP/1.0 304 Not Modified
    Date: Sat, 08 Oct 2011 02:31:54 GMT
    Content-Type: text/plain
    Expires: Fri, 01 Jan 2010 00:00:00 GMT
    Last-Modified: Sat, 08 Oct 2011 02:25:58 GMT
    ETag: "098f6bcd4621d373cade4e832627b4f6"
    Age: 232

    We see the additional If-Modifed-Since in the request, and the same Expires date in the response. Unfortunately, there’s an important missing header in this response: the Cache-Control header. It appears, at least from my testing, that CloudFront strips the Cache-Control headers from 304 responses.

    After this happens it appears that IE forgets the original Cache-Control header so all subsequent navigations to the page will trigger conditional GETs for those resources.  Since the 304 is missing the Cache-Control header, it just sees the Expires tag, and thinks it needs to always re-validate the content from now on.

    Why This Would Happen

    But what’s causing the re-validation (If-Modifed-Since) and subsequent 304 in the first place?

    User agents shouldn’t normally re-validate these resources, since the original Cache-Control header should keep it fresh for quite a while.  Except, when you either force a refresh (F5) of the page, or if the content has passed its natural freshness.

    On F5 refresh, all resources on the page are conditionally re-validated via If-Modified-Since. And, as we’ve seen, the resources on CloudFront are sent back missing the original Cache-Control header, and IE updates its cache with just the Expires tag, instead of keeping the resource still fresh for a year. For some reason, this doesn’t occur with Chrome or Firefox on F5.

    In addition, the problem will appear in all browsers when they need to send a If-Modified-Since header for re-validation of content they think might have expired, such as with max-age headers that have expired (shorter-expiring content).

    Take, for example, a resource that you set to expire 1 day from now, and either set the Expires header to 1 day from now (per best practices) or simply don’t specify the Expires header:

    Cache-Control: public, max-age=86400

    For the first 24 hours after your visitor loads the resource, modern browsers won’t re-validate the resource. At hour 24 and 1 second, the browser will send a conditional request. Unfortunately, with CloudFront, the 304 response will be missing the Cache-Control header.  The browser then doesn’t realize that the resource should be fresh for another 24 hours. So even if the content wasn’t actually updated after those 24 hours, all subsequent navigations with the resource will trigger a conditional validate of that resource, since the original Cache-Control headers were lost with the 304. Ugh.

    How to Avoid the Issue

    Note this doesn’t appear to affect Chrome 14 and FireFox 6 in the F5 scenario. Both browsers send conditional If-Modified-Since headers on F5 and get back the same CloudFront response (sans Cache-Control headers), but they don’t appear to be affected by the missing Cache-Control header. Subsequent navigations in Chrome and FF after a F5 do not conditionally re-validate the CloudFront content. They do appear to be affected by the missing Cache-Control header for naturally stale content on If-Modified-Since requests.

    I haven’t investigated the F5 problem on pre-IE9 versions, but I would assume the problem exists there as well. As far as I can tell, this isn’t fixed in IE10 beta.

    I’ve only found this problem on CloudFront’s CDN servers. I couldn’t find a way to get Apache to naturally skip the Cache-Control header for 304s if the header was in the original HTTP 200 response (for example, when using mod_expires on static content).

    The bottom line is that requests that send an If-Modified-Since to CloudFront and get a 304 back will essentially lose the Cache-Control hints. If your Expires header is missing, or in the past, the resource will be conditionally validated on every page navigation until it gets evicted from the cache. That can cause a lot of unnecessary requests and will slow down your visitor’s page loads.

    The simple solution is to use a much-further expiry time.  30 years should suffice. Then, if the original Cache-Control header is lost from CloudFront 304s, the 30-year-from-now Expires header will keep the resource from having to be validated.

    I’m not sure why Amazon CloudFront strips the Cache-Control header from 304 responses. I’ll follow up with them.

    Back to my original problem: I think it’s actually Amazon’s CloudFront servers noting that the Expires for a lot of my static images are past-due.  They’re checking the origin server to see if any new content is available.  The above issue isn’t likely causing a ton of additional load, but it was interesting to find none-the-less!

    Update 2011-10-12: I’ve opened a thread on the Amazon CloudFront forums here.  The team has responded saying they’re looking into the issue.

    Update 2011-12-18: The Amazon CloudFront team has fixed the issue!